How To Stop Tesla Alarm? (All You Need To Know)
Last updated on September 12th, 2023 at 03:05 am
The tesla security alarm is a feature that notifies you of specific actions concerning your vehicle.
For example, a battery-backed siren or intrusion sound alarm may trip off depending on the situation.
You might not like the security alarm feature on the Tesla, and you decide you want to turn it off. That makes you ask; How do you disable Tesla’s alarm?
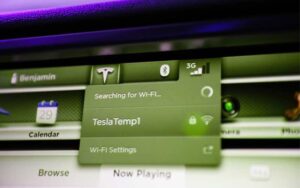
You can quickly stop the alarm when you tap any button on your Tesla app. However, if you decide to deactivate the alarm feature permanently, you’ll have to get to the controls on your Tesla’s touchscreen.
In this article, I’ll provide details on deactivating your tesla alarm. You’ll also get to know about what triggers the Tesla alarm and the reasons why the alarm might refuse to go off.
How Do You Stop Tesla Alarm From Going Off?

You can easily deactivate the alarm on your Tesla by pressing any button on your mobile app when the alarm goes off.
You can also turn off the alarm using your key fob or key card on your Tesla card reader. You can find the card reader below the autopilot camera on the driver’s side door pillar.
Here’s how to manually disable the alarm on your Tesla:
- On the main screen of your Tesla, click on “controls.”
- After clicking on controls, click on the option “Safety.”
- On the screen display, you’ll find “Security alarm .”Toggle the alarm off to deactivate it.
There is a feature that works hand in hand with Tesla security alarms. This feature is known as the sentry mode.
The sentry mode helps to watch your car for your lock and park it in a particular location.
When your car detects unusual activities around it, the feature will cause your vehicle to take action.
Your car will start recording the activities through its cameras, and the security alarm system will notify you through the Tesla app about unusual activity.
For your car to record, you must have correctly installed the dashcam on your vehicle.
Here are steps on how to properly install a dashcam on your vehicle:
- The first step is to get a USB flash drive and format it.
- To format the USB flash drive, plug it into a UB port on your Tesla
- On the Tesla main screen, click on “Safety and Security.”
- Once you tap on “Safety and Security,” a new display screen will pop up. Tap on “Format USB Device” to format the USB flash drive
- exFAT, FAT 32, MS-DOS FAT, ext3, or ext4 are the only formats supported for your USB flash drive.
The Sentry mode feature allows you to control your vehicle from far away through the Tesla mobile app and view what is going on through the Live camera.
However, there are some requirements you must meet to be able to use the Live camera feature on your Tesla, and they include the following:
- You must install the Tesla mobile app of version 4.2.1 or higher
- You must have access to premium connectivity on your Tesla. Subscribing for premium connectivity on your Tesla costs $9.99 monthly or $99 yearly.
- Your Tesla must not be of Model S or X (2012-2020) because they do not support the live camera feature.
Here’s how to enable Live cam on a Tesla Model S or Tesla Model X:
- On the main screen of your Tesla, tap on “controls.”
- After tapping on “controls,” navigate to “Safety” and tap on it
- Finally, tap on “view live camera via mobile app.”
Here’s how to enable Live cam on a Tesla Model 3 and Model Y:
- On the main screen of your Tesla, tap on “controls.”
- After tapping on “controls,” navigate to “Safety” and tap on it
- Tap on “view live camera via mobile app.”
After enabling the live camera on your Tesla, what you need to do to finish the job is to turn on access from the mobile app.
Here’s how to access the live camera from your mobile app:
- On the app, tap on “controls.”
- After tapping on “controls,” go to “safety and security.”
- Tap on “View Live camera via mobile app” to access the live camera on your Tesla.
If you need to disable the alarm system on your Tesla, you’ll need first to turn off sentry mode on your Tesla.
Here’s how to turn off sentry mode on your Tesla:
- On the main screen of your Tesla, tap on “controls.”
- Navigate to “Safety and security” and tap on it.
- After tapping “safety and security,” you’ll see the “Sentry mode” option.
- Toggle off the option to disable sentry mode.
What Triggers a Tesla Alarm?
The security alarm is a feature on your Tesla that notifies you about some actions on your Tesla. The alarm on your Tesla can get triggered for different reasons.
Some actions that can trigger the alarm on your Tesla include:
- Your Tesla alarm will start when the trunk or locked door is open without authorization. The car needs a key card, key fob, or authenticated phone to verify.
- The Tilt or intrusion sound alarm will go off when the car detects motion or when a machine like a tow truck or jack cause motion of your vehicle.
- Loud noises from the environment where your vehicle is.
Why Does My Tesla Alarm Keep Going off?
Here are some of the reasons why your Tesla alarm will jeep go off and how to fix it:
#1. Systems Errors
Your Tesla alarm might keep going off because of errors present in the operating system of your Tesla. One way to quickly fix these errors is to reboot your Tesla.
To reboot your vehicle, hold unto the scroll buttons on your steering wheel and hit the brakes until your Tesla’s touchscreen goes off.
The touchscreen will light up after a while, and the rebooting process will begin.
#2. Faulty Door Handles
Your Tesla might trip off a false alarm when the door handles are faulty. If you notice the door handle is faulty, you must fix it.
Here is a table showing materials you will need to fix your Tesla’s door handle and the function they are to perform:
| Material | Function |
|---|---|
| WD-40 | To lubricate the pins and make it easy to pull them out |
| Torx bits | To remove the bolts on the assembly |
| Needle nose pliers | To remove the pins |
| Screws | To hold the door handle in position |
| Zip ties | To secure the main power of the door handle |
Here are steps on how to repair the door handle of a Tesla:
- The first step take is to remove the door handle assembly
- Remove the vapor cover from the zip ties of the assembly
- Use Torx bits to remove the five bolts you find
- Remove the motor from the assembly
- Remove the two screw holding unto the handle of the door
- Use WD-40 to lubricate the pin on the rear side of the assembly, and use needle nose pliers to remove the pin.
- Press down on the door handle to install the new gear
- Put the pin back in and install a new metal clip into the center notch
- Use the screws you removed before to hold the door handle in position
- Use zip ties to secure the door handles’ primary power wire to the bottom of the assembly
- Reinstall the motor, wires, and vapor cover to the assembly to finish off the job

Hey, I’m Michael Davis, a 35-year-old with a degree and a love for cars and tech. Since I was a kid, cars have been my thing—so much that I even thought they ran on magic beans! Fast forward, and I’ve built Vehicle Army, your one-stop-shop for easy-to-understand car facts.